Слайд 2
Järgmiste loengute struktuur
Loengud algavad riistvara tasemelt (alates transistorist)
ja liiguvad üha suurema abstraktsuse suunas:
Riistvara
Protsessori programmeerimine, assembler
Kõrgkeeled: mugavam
programmeerimine
Suurte rakendussüsteemide kokkupanek, opsüsteem, komponentide kasutamine
Võrgurakenduste kokkupanek: hulga arvutite kui rakenduse komponentide kasutamine
Eriti võimsad kõrgkeeled, funktsionaalne ja loogiline programmeerimine
Teooriat: keerukus, lahenduvus: mida saab kui ruttu arvutada, mida saab üldse arvutada
Tehisintellekt
IT äri ja juhtimine: kuidas raha saada
Слайд 3
Olulisi põhimõtteid “abstraktsioonide” osas
Kõrgkeeled, komponendid, võrguvärk jms on
vajalik ainult selleks, et arendaja saaks rakendusi kiiremini teha.
Arendaja mõtleb abstraktsioonide tasemel, aga lõpuks töötab kõik ikkagi transistoridel.
Abstraktsioonid nö “tilguvad läbi”: iga abstraktsiooni juures on vaja põhimõtteliselt aru saada, kuidas töötab alumine, vähem abstraktne tase. Alati on vahel vaja midagi allpool teha!!!
Arendajal on reeglina kalduvus üle-abstraheerida! Süsteemi ehitamisel tuleb ise, meelega vähem abstraheerida, kui tahaks. Näiteks ei õnnestu enamasti tarkvara taaskasutus jne jne ...
Loe juurde: The law of leaky abstractions: http://www.joelonsoftware.com/articles/LeakyAbstractions.html
Слайд 4
Ülevaade loengust
Tarkvara tööpõhimõtted ja programmeerimiskeelte hierarhia
Riistvara:
Riistvara komponendid
Protsessori tööpõhimõte
Programmeerimiskeelte
hierarhia ja mehaanika (jätkub järgmine loeng)
Assembler
C
C ja assembler
C
ja mäluhaldus
Kõrgema taseme keeled
Prahikoristus
Listid
Keeled
Слайд 5
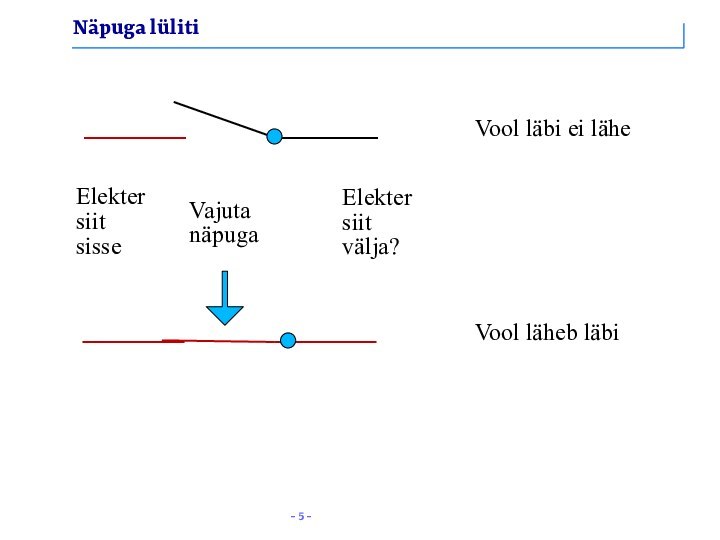
Näpuga lüliti
Vool läbi ei lähe
Vool läheb läbi
Elekter
siit
sisse
Elekter
siit
välja?
Vajuta
näpuga
Слайд 6
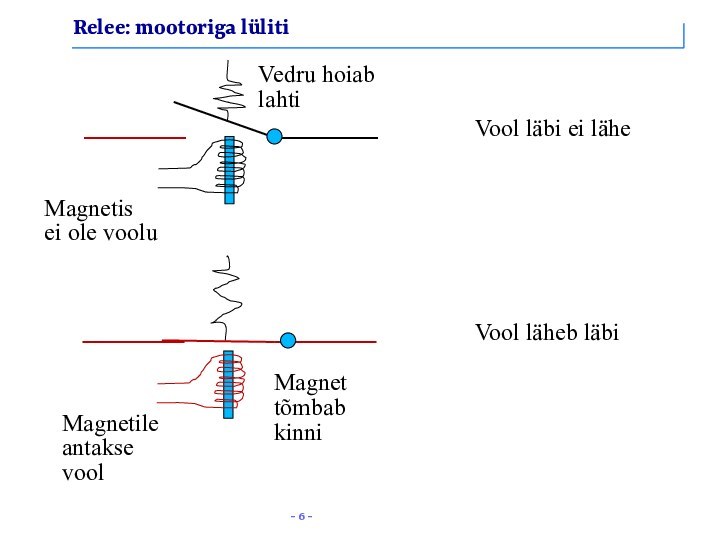
Relee: mootoriga lüliti
Vool läbi ei lähe
Vool läheb
läbi
Vedru hoiab
lahti
Magnet
tõmbab
kinni
Magnetis
ei ole voolu
Magnetile
antakse
vool
Слайд 7
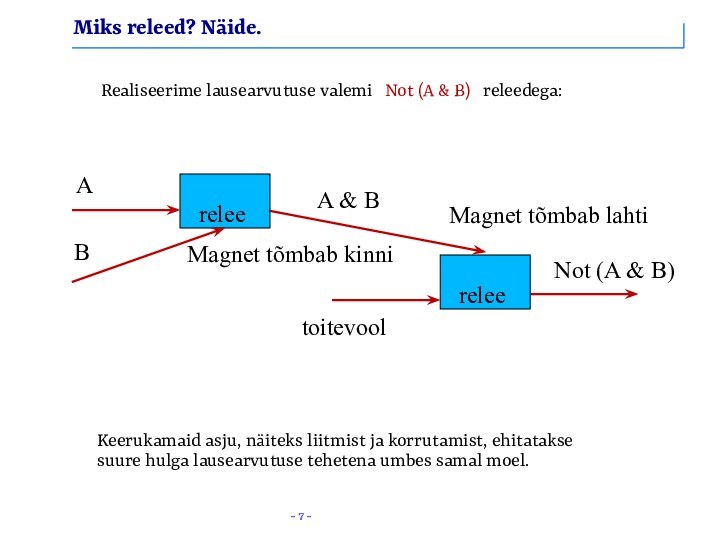
Miks releed? Näide.
Realiseerime lausearvutuse valemi Not
(A & B) releedega:
relee
A & B
relee
Not
(A & B)
A
B
toitevool
Magnet tõmbab lahti
Magnet tõmbab kinni
Keerukamaid asju, näiteks liitmist ja korrutamist, ehitatakse
suure hulga lausearvutuse tehetena umbes samal moel.
Слайд 8
Komponendid
Peamine idee: transistorid kui “katkestusmootoriga” lülitid
C = (A and -B)
Väikestest komponentidest ehitatakse suuremaid, millest omakorda veel suuremaid.
Komponendid on kui mustad kastid: teame nende väljundit vastava sisendi korral, aga enamasti mitte nende tehnilist sisu.
Sisend A:
vool sees: 1
vool väljas: 0
Väljund C:
vool sees: 1
vool väljas: 0
Lüliti B:
vool sees, 1: katkesta
vool väljas, 0: ühenda
Слайд 9
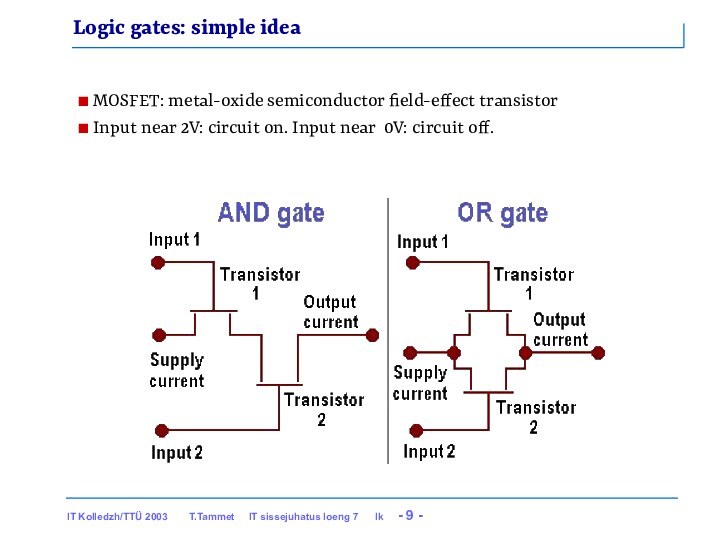
Logic gates: simple idea
MOSFET: metal-oxide semiconductor field-effect
transistor
Input near 2V: circuit on. Input near 0V:
circuit off.
Слайд 10
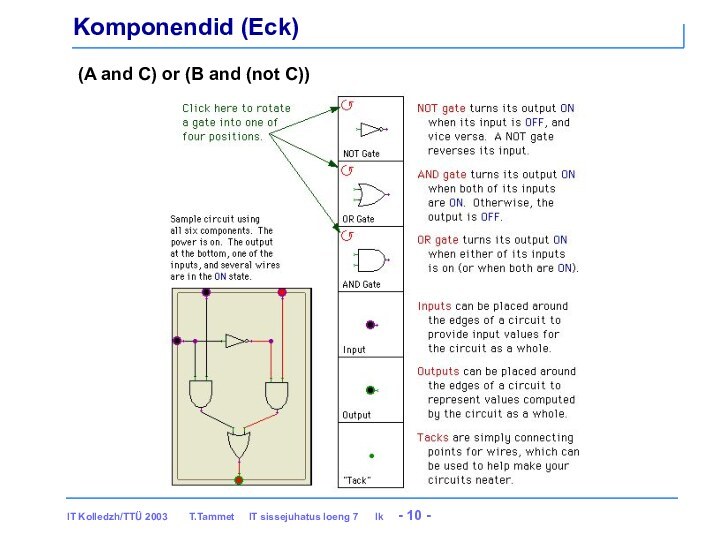
Komponendid (Eck)
(A and C) or (B and
(not C))
Слайд 11
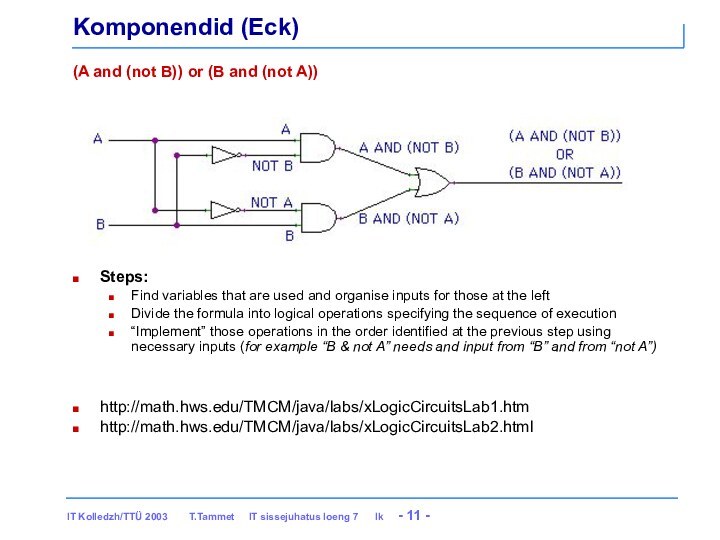
Komponendid (Eck)
(A and (not B)) or (B and
(not A))
Steps:
Find variables that are used and organise inputs
for those at the left
Divide the formula into logical operations specifying the sequence of execution
“Implement” those operations in the order identified at the previous step using necessary inputs (for example “B & not A” needs and input from “B” and from “not A”)
http://math.hws.edu/TMCM/java/labs/xLogicCircuitsLab1.htm
http://math.hws.edu/TMCM/java/labs/xLogicCircuitsLab2.html
Слайд 12
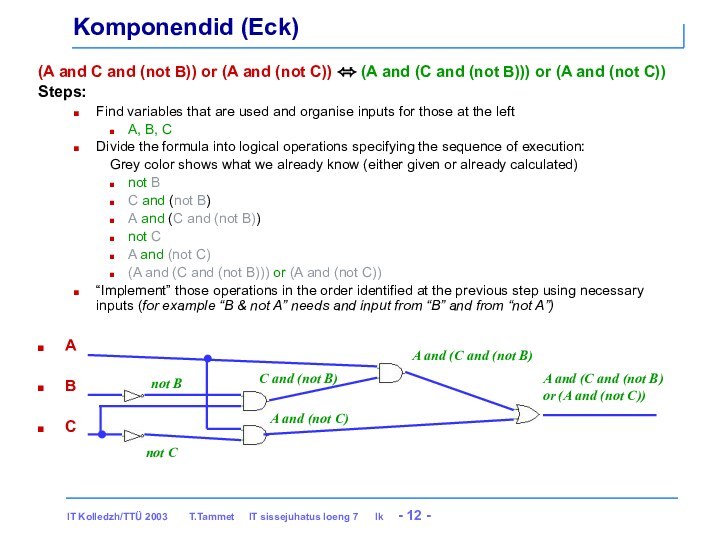
(A and C and (not B)) or (A
and (not C)) ⬄ (A and (C and (not
B))) or (A and (not C))
Steps:
Find variables that are used and organise inputs for those at the left
A, B, C
Divide the formula into logical operations specifying the sequence of execution:
Grey color shows what we already know (either given or already calculated)
not B
C and (not B)
A and (C and (not B))
not C
A and (not C)
(A and (C and (not B))) or (A and (not C))
“Implement” those operations in the order identified at the previous step using necessary inputs (for example “B & not A” needs and input from “B” and from “not A”)
A
B
C
Komponendid (Eck)
not B
not C
C and (not B)
A and (not C)
A and (C and (not B)
A and (C and (not B) or (A and (not C))
Слайд 13
Neljabitine liitja (four-bit adder)
Kaheksa pluss kaks sisendjuhet,
neli pluss üks väljundjuhet
1011 1111
1111 1010 0111 0001
0110 0001 1111 0101 1010 0011
----- ----- ----- ----- ----- -----
10001 10000 11110 01111 10001 00100
Слайд 14
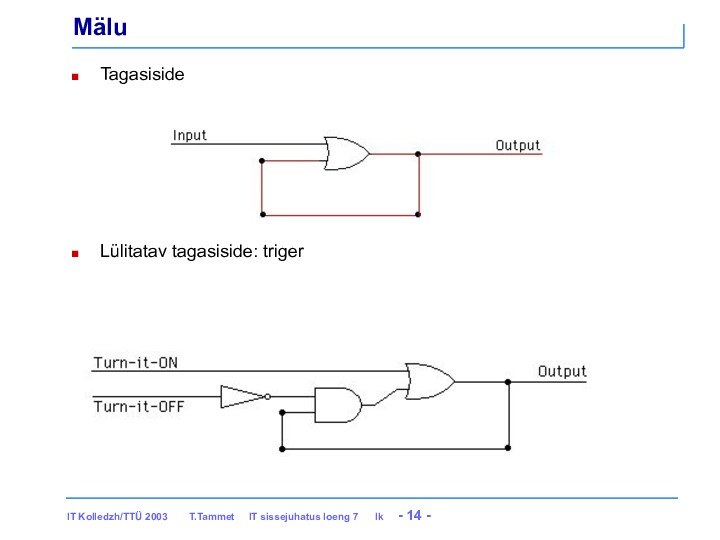
Mälu
Tagasiside
Lülitatav tagasiside: triger
Слайд 15
Mälu
Tagasiside
Kuidas töötab
Result of:
“Input” or “Output as feedback”
Слайд 16
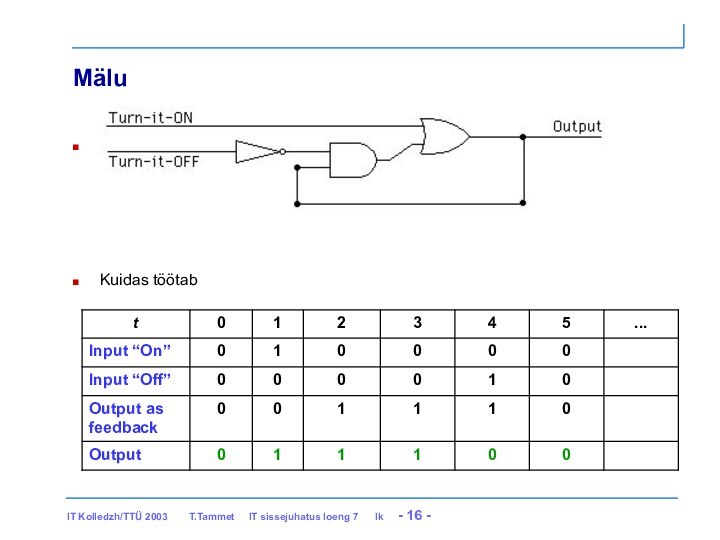
Mälu
Lülitatav tagasiside: triger
Kuidas töötab
Слайд 17
Ühebitine mälukiip
Kaks sisend- ja üks väljundjuhe
Слайд 18
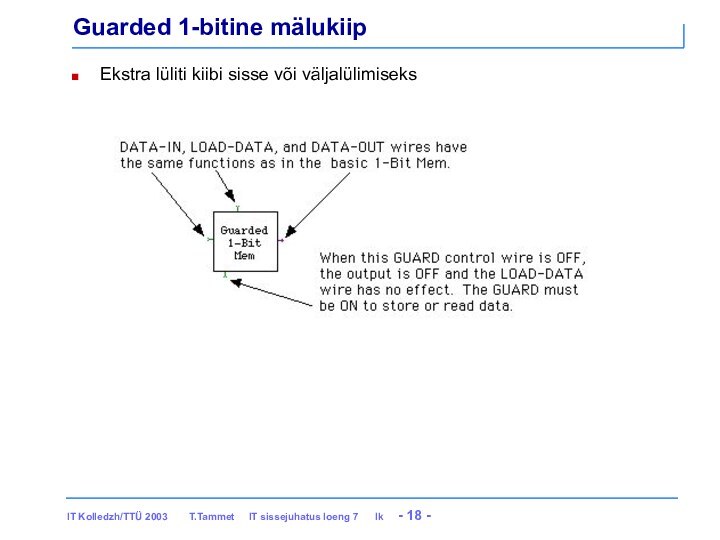
Guarded 1-bitine mälukiip
Ekstra lüliti kiibi sisse või väljalülimiseks
Слайд 20
Ecki xComputer
http://math.hws.edu/TMCM/java/labs/xComputerLab1.html
Arvuti põhiosade (protsessor + mälu) simulatsioon väikese
Java programmiga.
Käsusüsteem sarnaneb väga esimeste päris-mikroprotsesoritega
Lihtsama arusaadavuse tõttu kasutab
kahebaidiseid mälupesi (16 bitti), mitte ühebaidiseid, nagu harilik arvuti.
Mälu on 1024 pesa (1 K), seega 2 Kbaiti.
Aadressi jaoks kasutusel 10 bitti.
Esimestel koduarvutitel oli ka 4-16 Kbaiti (umbes sama hulk mälu)
Olulist: protsessori sees on väike hulk spetsiaal-mälupesi (registrid)
Tehteid saab teha ainult nende registrite vahel.
Ei ole näiteks võimalik liita otse kahte mälus olevat arvu: enne tuleb nad registritesse kopeerida, siis seal liita, siis tulemusregistrist (nn akumulaator) mäll kirjutada.
Koha, kust mälust loetakse/kirjutatakse näitab ADDR register.
Koha, kust lugeda järgmine käsk, näitab PC (program counter) register
Слайд 21
Käskude täitmine
Kaks tsüklit üksteise sees:
Välimine tsükkel suurendab igal
ringil PC-d (program counterit), st igal ringil võetakse täidetav
käsk järgmisest mälupesast.
Sisemine tsükkel toimub iga käsu sees. Sisemise tsükli jooksul täidetakse käsu sisemisi pisi-samme.
Üks pisi-samm vastab mingile juhtmele voolu peale andmisele, mispeale käivitub vastav loogika-ahel protessoris ja selle tulemus salvestatakse mõnda registrisse.
Masina taktsagedus on see sagedus, kui tihti pisi-samme täidetakse. Iga järgmise pisi-sammu alustamise jaoks on masinas kell, mis annab kindla sagedusega impulsse. Pisi-sammu number saadakse nende impulsside kokkulugemisega.
Слайд 22
Protsessori põhiregistrid
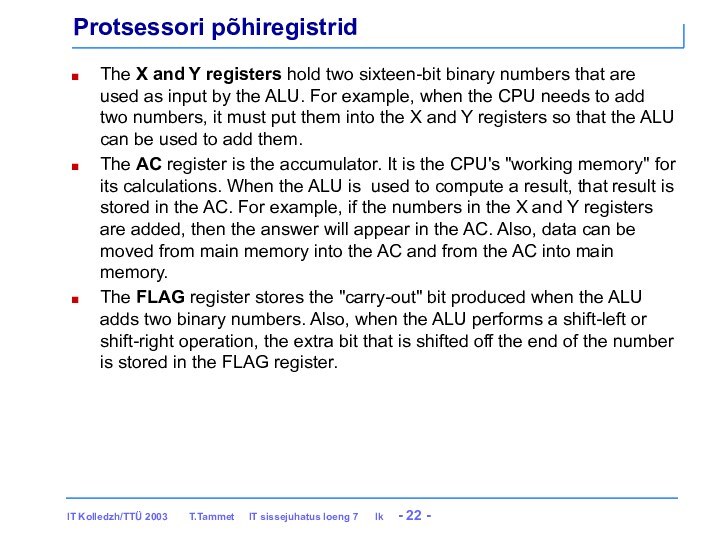
The X and Y registers hold two
sixteen-bit binary numbers that are used as input by
the ALU. For example, when the CPU needs to add two numbers, it must put them into the X and Y registers so that the ALU can be used to add them.
The AC register is the accumulator. It is the CPU's "working memory" for its calculations. When the ALU is used to compute a result, that result is stored in the AC. For example, if the numbers in the X and Y registers are added, then the answer will appear in the AC. Also, data can be moved from main memory into the AC and from the AC into main memory.
The FLAG register stores the "carry-out" bit produced when the ALU adds two binary numbers. Also, when the ALU performs a shift-left or shift-right operation, the extra bit that is shifted off the end of the number is stored in the FLAG register.
Слайд 23
... Registrid ...
The ADDR register specifies a location
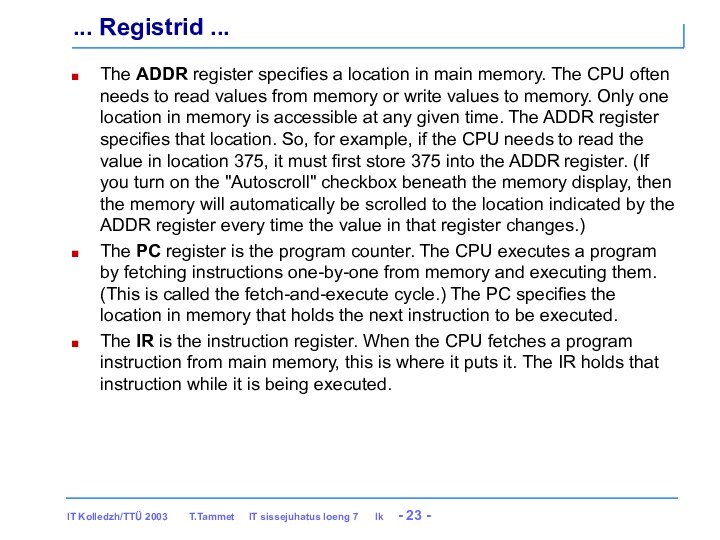
in main memory. The CPU often needs to read
values from memory or write values to memory. Only one location in memory is accessible at any given time. The ADDR register specifies that location. So, for example, if the CPU needs to read the value in location 375, it must first store 375 into the ADDR register. (If you turn on the "Autoscroll" checkbox beneath the memory display, then the memory will automatically be scrolled to the location indicated by the ADDR register every time the value in that register changes.)
The PC register is the program counter. The CPU executes a program by fetching instructions one-by-one from memory and executing them. (This is called the fetch-and-execute cycle.) The PC specifies the location in memory that holds the next instruction to be executed.
The IR is the instruction register. When the CPU fetches a program instruction from main memory, this is where it puts it. The IR holds that instruction while it is being executed.
Слайд 24
... Registrid ...
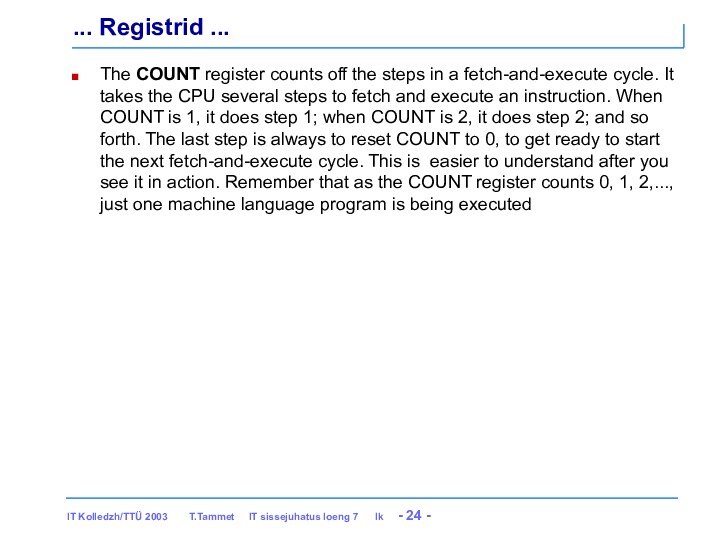
The COUNT register counts off the
steps in a fetch-and-execute cycle. It takes the CPU
several steps to fetch and execute an instruction. When COUNT is 1, it does step 1; when COUNT is 2, it does step 2; and so forth. The last step is always to reset COUNT to 0, to get ready to start the next fetch-and-execute cycle. This is easier to understand after you see it in action. Remember that as the COUNT register counts 0, 1, 2,..., just one machine language program is being executed
Слайд 25
lod-c 17 into some memory location
COUNT becomes 1,
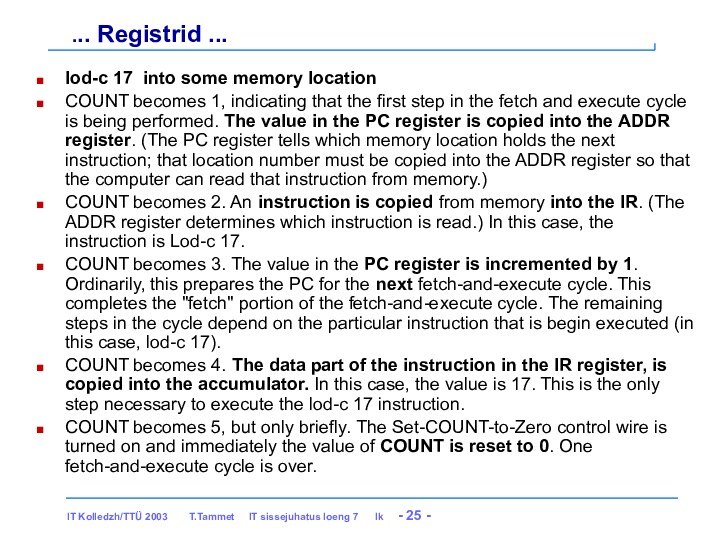
indicating that the first step in the fetch and
execute cycle is being performed. The value in the PC register is copied into the ADDR register. (The PC register tells which memory location holds the next instruction; that location number must be copied into the ADDR register so that the computer can read that instruction from memory.)
COUNT becomes 2. An instruction is copied from memory into the IR. (The ADDR register determines which instruction is read.) In this case, the instruction is Lod-c 17.
COUNT becomes 3. The value in the PC register is incremented by 1. Ordinarily, this prepares the PC for the next fetch-and-execute cycle. This completes the "fetch" portion of the fetch-and-execute cycle. The remaining steps in the cycle depend on the particular instruction that is begin executed (in this case, lod-c 17).
COUNT becomes 4. The data part of the instruction in the IR register, is copied into the accumulator. In this case, the value is 17. This is the only step necessary to execute the lod-c 17 instruction.
COUNT becomes 5, but only briefly. The Set-COUNT-to-Zero control wire is turned on and immediately the value of COUNT is reset to 0. One fetch-and-execute cycle is over.
... Registrid ...
Слайд 26
Lets say we have the following part of
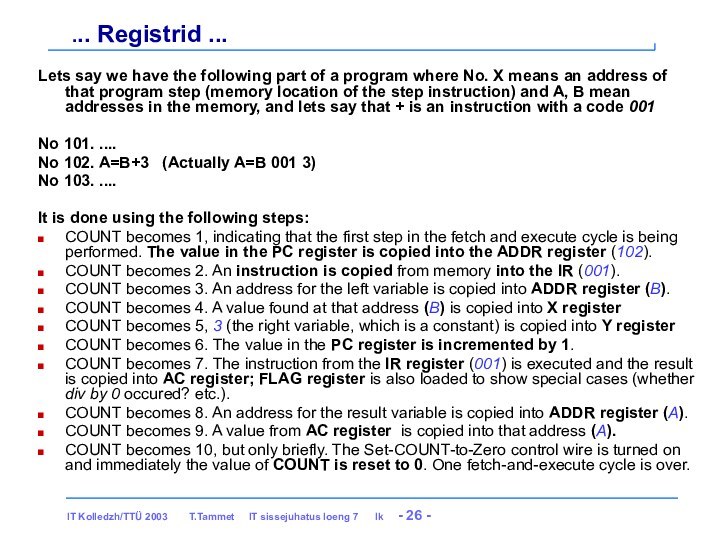
a program where No. X means an address of
that program step (memory location of the step instruction) and A, B mean addresses in the memory, and lets say that + is an instruction with a code 001
No 101. ....
No 102. A=B+3 (Actually A=B 001 3)
No 103. ....
It is done using the following steps:
COUNT becomes 1, indicating that the first step in the fetch and execute cycle is being performed. The value in the PC register is copied into the ADDR register (102).
COUNT becomes 2. An instruction is copied from memory into the IR (001).
COUNT becomes 3. An address for the left variable is copied into ADDR register (B).
COUNT becomes 4. A value found at that address (B) is copied into X register
COUNT becomes 5, 3 (the right variable, which is a constant) is copied into Y register
COUNT becomes 6. The value in the PC register is incremented by 1.
COUNT becomes 7. The instruction from the IR register (001) is executed and the result is copied into AC register; FLAG register is also loaded to show special cases (whether div by 0 occured? etc.).
COUNT becomes 8. An address for the result variable is copied into ADDR register (A).
COUNT becomes 9. A value from AC register is copied into that address (A).
COUNT becomes 10, but only briefly. The Set-COUNT-to-Zero control wire is turned on and immediately the value of COUNT is reset to 0. One fetch-and-execute cycle is over.
... Registrid ...
Слайд 27
Hierarhia pistikutest progekeelteni
Esimene: programmeerimismeetod: kaablid ja pistikud
Teine: von
Neumanni arhitektuur, programm mälus binaarkoodina:
01011101 01001011 01010101
11010101 10101001 ..
Lihtsam kirjutada hexas, ntx 4A FC 09 B2 ....
Kolmas: Esmane progekeel: assembler.
Üks masinakäsk: tüüpiliselt üks rida assembleriprogrammi
Neljas: Harilik progekeel ehk nn kõrgkeel (fortran, basic, c, java,
jne).
Harilikud valemid, if-then-else jne, a la x=2*y+sin(y);
0000 = 0
0001 = 1
0010 = 2
0011 = 3
0100 = 4
0101 = 5
0110 = 6
0111 = 7
1000 = 8
1001 = 9
1010 = A
1011 = B
1100 = C
1101 = D
1110 = E
1111 = F
Слайд 28
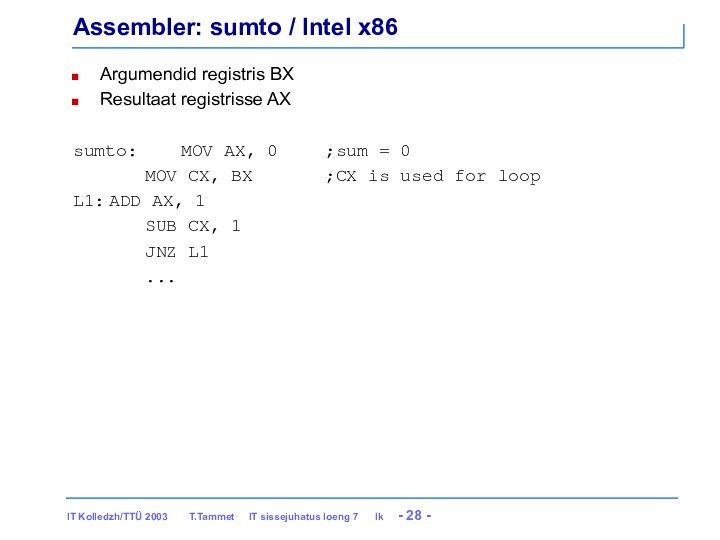
Assembler: sumto / Intel x86
Argumendid registris BX
Resultaat
registrisse AX
sumto: MOV AX, 0 ;sum =
0
MOV CX, BX ;CX is used for loop
L1: ADD AX, 1
SUB CX, 1
JNZ L1
...
Слайд 29
Kõrgkeeled
Automatiseerivad ja lihtsustavad hulga “harilikke” protseduure, mida assembleris
programmeerides vaja
Ei anna assembleriga analoogilist kontrolli masina üle
Kõrgkeeled on
erineva abstraktsusastmega:
Masinalähedane ja ebamugav: Fortran, C (portaabel assembler)
Abstraktsem ja mugavam: Lisp, Ada, ML, Java, Python,
Peale programmeerimiskeelte on veel hulk muid keeli:
Päringukeeled (SQL, RDQL, ....)
Kujunduskeeled (HTML, PS, ...)
Spetsifitseerimiskeeled (loogikakeeled, UML, ....)
....
Слайд 30
Programming is linguistic
Programming is an explanatory activity.
To
yourself, now and in the future.
To whoever has to
read your code.
To the compiler, which has to make it run.
Explanations require language.
To state clearly what is going on.
To communicate ideas over space and time.
Слайд 31
Languages are essential
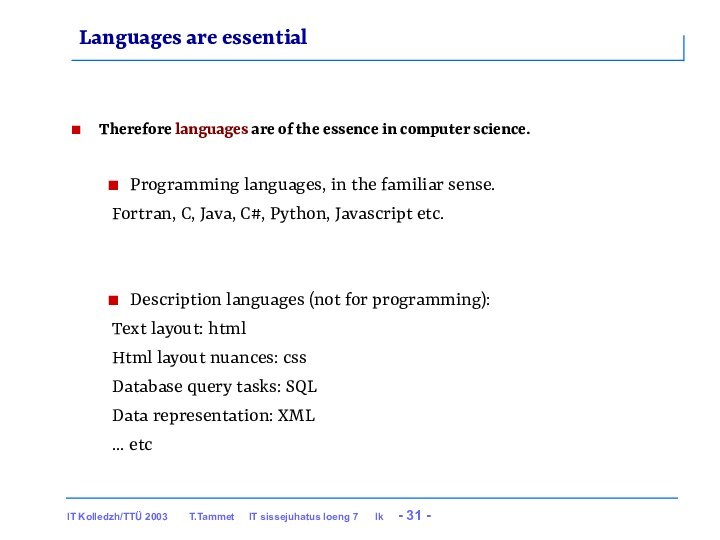
Therefore languages are of the
essence in computer science.
Programming languages, in the familiar sense.
Fortran, C, Java, C#, Python, Javascript etc.
Description languages (not for programming):
Text layout: html
Html layout nuances: css
Database query tasks: SQL
Data representation: XML
... etc
Слайд 32
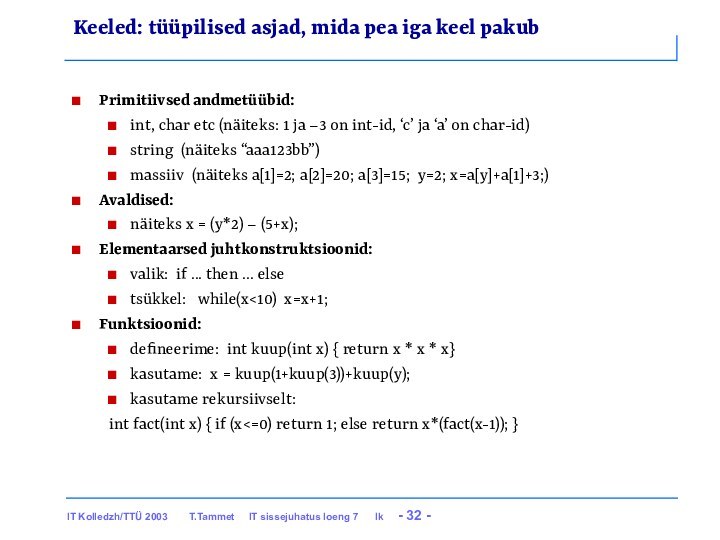
Keeled: tüüpilised asjad, mida pea iga keel pakub
Primitiivsed
andmetüübid:
int, char etc (näiteks: 1 ja –3 on int-id,
‘c’ ja ‘a’ on char-id)
string (näiteks “aaa123bb”)
massiiv (näiteks a[1]=2; a[2]=20; a[3]=15; y=2; x=a[y]+a[1]+3;)
Avaldised:
näiteks x = (y*2) – (5+x);
Elementaarsed juhtkonstruktsioonid:
valik: if ... then ... else
tsükkel: while(x<10) x=x+1;
Funktsioonid:
defineerime: int kuup(int x) { return x * x * x}
kasutame: x = kuup(1+kuup(3))+kuup(y);
kasutame rekursiivselt:
int fact(int x) { if (x<=0) return 1; else return x*(fact(x-1)); }
Слайд 33
Keeled: näited lisavõimalustest eri keeltes
Kiired bitioperatsioonid, otsepöördumine mälu
kallale: C
Keerulisemad andmetüübid: listid, hash tabelid jne: Lisp, Python,
Javascript
Erikonstruktsioonid stringitöötluseks: Perl, PHP
Objektid: C++, Java, C#, Python, Lisp
Moodulid (enamasti ühendatud objektidega): C++, Java, C#
Veatöötluse konstruktsioonid (exceptions): Python, Java, C#
Prahikoristus: kasutamata andmed visatakse välja (Java, Python, Lisp, ...)
Sisse-ehitatud tugi paralleelprogrammide jaoks: Java, C#
Reaalaja-erivahendid: Ada
“Templates” (programm tulemuse sees): PHP, JSP, Pyml
Uute programmide konstrueerimine töö käigus: Lisp, Scheme, Javascript
Loogikareeglid: Prolog
“laisk” viis funktsioone arvutada: Miranda, Hope, Haskell
Pattern matching (viis funktsioone defineerida): ML, Haskell
jne...
Слайд 34
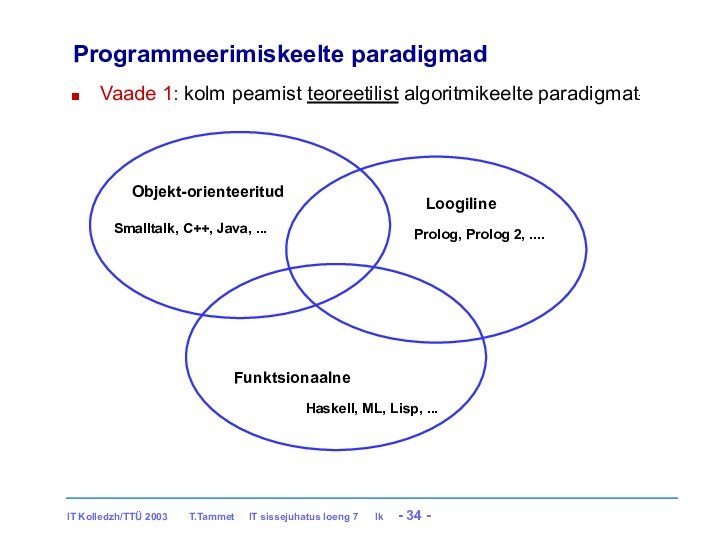
Programmeerimiskeelte paradigmad
Vaade 1: kolm peamist teoreetilist algoritmikeelte paradigmat:
Objekt-orienteeritud
Loogiline
Funktsionaalne
Haskell,
ML, Lisp, ...
Prolog, Prolog 2, ....
Smalltalk, C++, Java, ...
Слайд 35
Keelte erisused: kolm põhiasja
Süntaks (kuidas kirjutatakse näiteks if
.. then .. else ühes või teises keeles)
Semantika ehk
tähendus (mida õigesti kirjutatud programm tegelikult siis teeb)
Teegid (libraries) (millised valmisprogrammijupid on selle keele jaoks kergesti kättesaadavad või kohe kaasa pandud)
Слайд 36
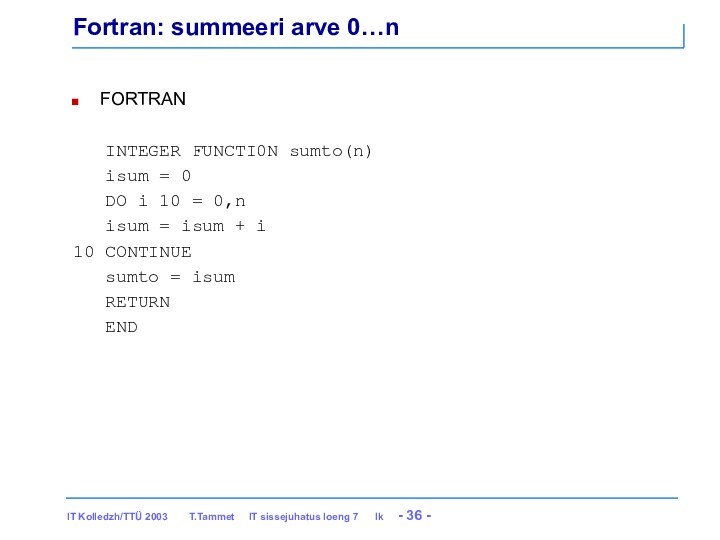
Fortran: summeeri arve 0…n
FORTRAN
INTEGER FUNCTI0N
sumto(n)
isum = 0
DO
i 10 = 0,n
isum = isum + i
10 CONTINUE
sumto = isum
RETURN
END
Слайд 37
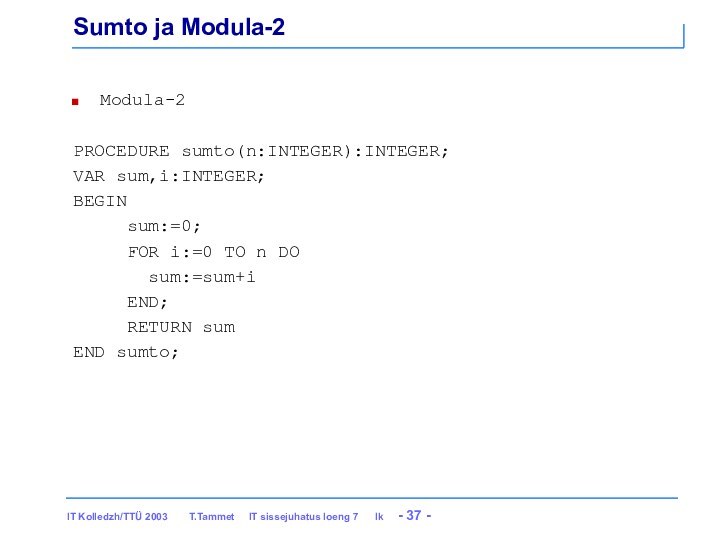
Sumto ja Modula-2
Modula-2
PROCEDURE sumto(n:INTEGER):INTEGER;
VAR sum,i:INTEGER;
BEGIN
sum:=0;
FOR i:=0
TO n DO
sum:=sum+i
END;
RETURN sum
END sumto;
Слайд 38
Sumto ja C
C (ja C++ ja Java ja
C#)
int sumto(int n) {
int i,sum = 0;
for(i=0; i<=n; i=i+1)
sum = sum + i;
return sum;
}
Слайд 39
Kuidas keeles X kirjutatud programmi täidetakse?
NB! arvuti suudab
täita ainult masinkoodis programme.
Kaks põhivarianti keeles X programmi täitmiseks.
Kompileerimine:
masinkoodis programm nimega kompilaator teisendab keeles X programmi masinkoodfailiks Y. Seejärel täidetakse saadud masinkoodis programm Y. Näide: C.
Interpreteerimine: masinkoodis programm nimega interpretaator loeb sisse X keeles faili, kontrollib/ veidi teisendab teda ja asub nö sisekujul varianti rida-realt täitma. Näited: Python, PHP, Perl, vanemad Javascripti mootorid jne.
NB!
Programmi interpreteerimine on ca 10-200 korda aeglasem, kui kompileeritud koodi täitmine.
Põhimõtteliselt saaks igas keeles kirjutatud programme nii interpreteeritult täita kui kompileerida.
Praktikas eelistatakse vahel interpreteerimist, vahel kompileerimist.
Слайд 40
Kuidas keeles X kirjutatud programmi täidetakse?
Kompromissvariante:
Kompilaator kompileerib X
faili vahekoodiks Y, seejärel interpreteeritakse vahekoodi Y (Python, Java).
Interpretaator
interpreteerib vahekoodi Y, kuid kompileerib töö ajal osa Y-st masinkoodiks, mida seejärel täidab (Java ja Firefoxi Javascript) nn just-in-time compilation ehk JIT.
Chrome V8 Javascript: kompileerib algul kogu programmi masinkoodiks kiire kompilaatoriga, seejärel kompileerib töö käigus selgunud kriitilised kohad aeglasema optimeeriva kompilaatoriga, mis annab kiiremini töötava tulemuse.
Слайд 41
Kompileeritava programmi valmimine
Olgu meil (näiteks C keeles) failid
main.c ja swap.c
Teeme gcc main.c swap.c -o minuprogramm
Kompilaator (näiteks
gcc) teeb järjest mitut eri asja:
Kompileerimine
Kompilaator teeb neist assemblerikeelsed ajutised failid
Kompilaator teeb assemblerfailidest masinkood+sümbolinfo failid
Linkimine
Linkur otsib kokku vajalikud olemasolevad failid osa sümbolinfo seostamiseks päris koodi-viidetega
Käivitame saadud programmifaili minuprogramm:
Opsüsteemi loader otsib lisaks vajalikud olemasolevad failid osa sümbolinfo seostamiseks päris koodi-viidetega
Saadud kogum paigutatakse mällu, tehakse opsüsteemi infoblokk tema jaoks (protsess) ja kogum käivitatakse
Слайд 42
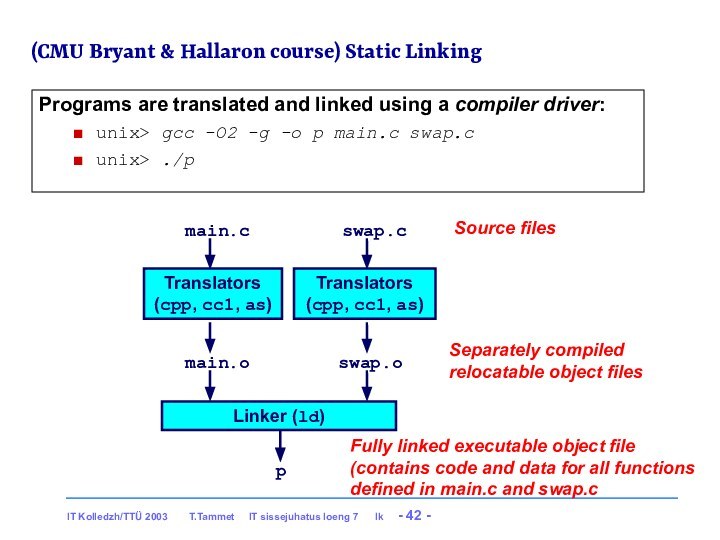
(CMU Bryant & Hallaron course) Static Linking
Programs are
translated and linked using a compiler driver:
unix> gcc -O2
-g -o p main.c swap.c
unix> ./p
Linker (ld)
Translators
(cpp, cc1, as)
main.c
main.o
Translators
(cpp, cc1, as)
swap.c
swap.o
p
Source files
Separately compiled
relocatable object files
Fully linked executable object file
(contains code and data for all functions
defined in main.c and swap.c
Слайд 43
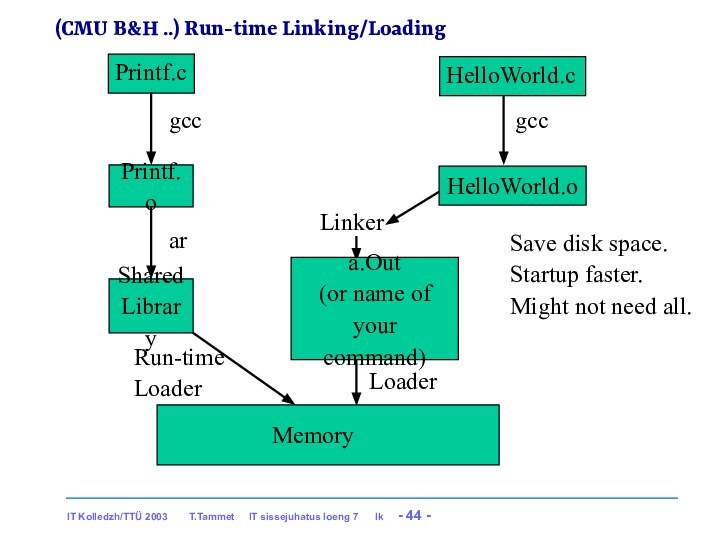
(CMU B&H ..) Static Linking and Loading
